Since you are here, that means you already know the magic of table saw sleds, Right? A table saw is really fantastic stuff to rip crosscut long pieces. People are repeatedly looking for the table saw crosscut sled plans.

To call a halt to this problem, we have come up with a solution. Here you will get to know the step-by-step process of how to make a sled. So, let’s see how you can build a sled for a crosscut and miter cut.
Step 1: Assemble Materials and Start Cuttings
First of all, you need to put together all the materials you need and make sure they are good quality products; especially the plywood needs to be smooth and flat.
There have two most tricky parts that you should consider gravely. The first one is cutting the runner as it slides smoothly, and the other one is managing the fence accurately. Digging digger the content, you will get to know how you could deal with them.
You will need the front rip fence, blade cover, and stiffener at the very beginning. To get the following:
- Cut some chunks of the plywood.
- Cut those ½ inches longer and ¼ inch wider than the required size for the trimming.
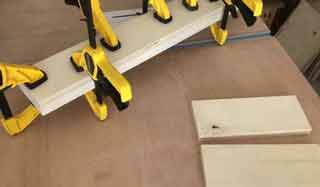
- Apply the wood glue on the chunks and clamp both strips together.
Make sure both of the fragments lined up correctly with one another. After using the adhesive, scrape off the flutter glue that gets spattered partially.
Next, mark about ¼ inches onto the chunks and run it through the jigsaw to saw the shred out. When you are done, move the pieces to a belt sander to make them smooth.
Now it’s time to work with the base and the runners.
Step 2: Base and Runner
Next, you need to separate the runner from the hardwood. The runner will need to ensure the smooth movement of the particular hardwood board. So it should be perfect in size as it doesn’t create any interruption to the change.
It would be best if you had a ¾ inches miter gauge slot for that. Plane a piece of 1×3 hardwood and places it on the grooves and inspect the movement. If it moves quickly, you have done a fantastic job.
After that, apply some glue to the strips and let them dry for 20 minutes. Then move off the stuff and scrape off the flutter glue from the bottom of the runners’ base and edge or it can interrupt the movement on the miter gauge slot. Also, check if there is any glue on the slot.

Slide back the sled on the slot and identify one more time whether it is rubbing or not. If the meal slot is rubbed with the wood, take 80-grit sandpaper and pasted it on a square block of wood. Then sand the area that blocks the movement.
Step 3: Attach the Stiffener and the Fence
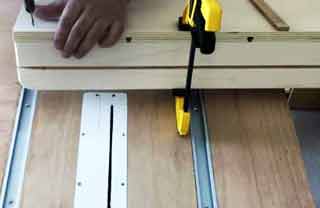
Align the stiffener with the front edge of the base and then glue and screw it properly. It is essential to line up the reinforcement in conformity with the base edge because you need to square the fence accurately. Also, remember; to be very careful while you are screwing something on the base. Always try to keep the screw away from the table saw blade. It can damage your saw and you as well.
Settle the blade to ¾ inches high and places the base in front of it. Start cutting the plate and stop within 3 inches back. It will be convenient if you mark the end-point before starting the cut.
Before carrying away the sled from the table, make sure you turned the saw off and wait till it stops.
After that, consider aligning the fence accurately with the base’s end edge and embed a screw into the base’s right side. Measure a 90-degree angle of the fence with the blade and clamp it tightly. Screw the fence carefully with the blade cover from the bottom.

After attaching both of them, put a measurement sticker on the fences to measure the object’s size.
Step 4: Test Cut
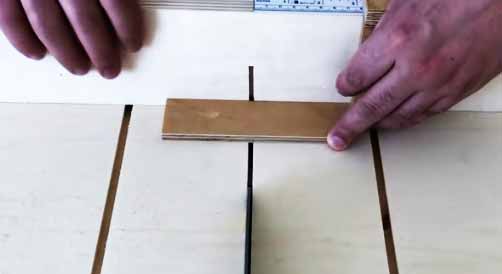
Now it’s time for a test cut. Take 12-inch plywood on the sled of your table saw and then cut it into two pieces. Then take the first half and flip it to another side. Now take the flipped side to the other section and inspect whether there has any gap or not. If they fit perfectly, drive some additional screws as needed to hold the fence tightly. Otherwise, try to fix the fence by tapping it with a hammer and make another test cut until it is perfect.

Step 5: Embed the Stop Blocks
If you are successfully done with the following table saw crosscut sled plan, it’s time to embed the stop blocks. Adding the stop block is very important to avoid cutting the sled cover with the saw.
Take some stop blocks and screw them on the bottom of the sled. That’s it.
FAQs
What is a table saw sled?
The sled is something that is used to cut a hardwood smoothly in pieces at several angles.
Can a sled cut the angle of 90 degrees?
Yes, very sharply.
Which woods are the best for the sled and fence?
We usually recommend MDF and Plywood.
Wrapping Up
I hope you have gone through the content attentively. This is the easiest and most productive way of making a table saw crosscut sled. Just follow the following instructions; you will surely get successful even if you are a beginner. Remember one thing, while you are operating the saw, be very careful. A little mistake can cause huge damage. So, make sure you are using all the safety equipment. All the best.
Our other posts on the table saw:
How to Save Yourself from Table Saw
How to Replace Table Saw Motor

Quick question, Do you have a preferred brand of table saws? Is there one that is the best? I’m in the market for one and I think I want to go cordless but I’m not so sure. Thanks in advance for your answer.