
How to Cut a Raked Crown Molding Return with a Miter Saw?
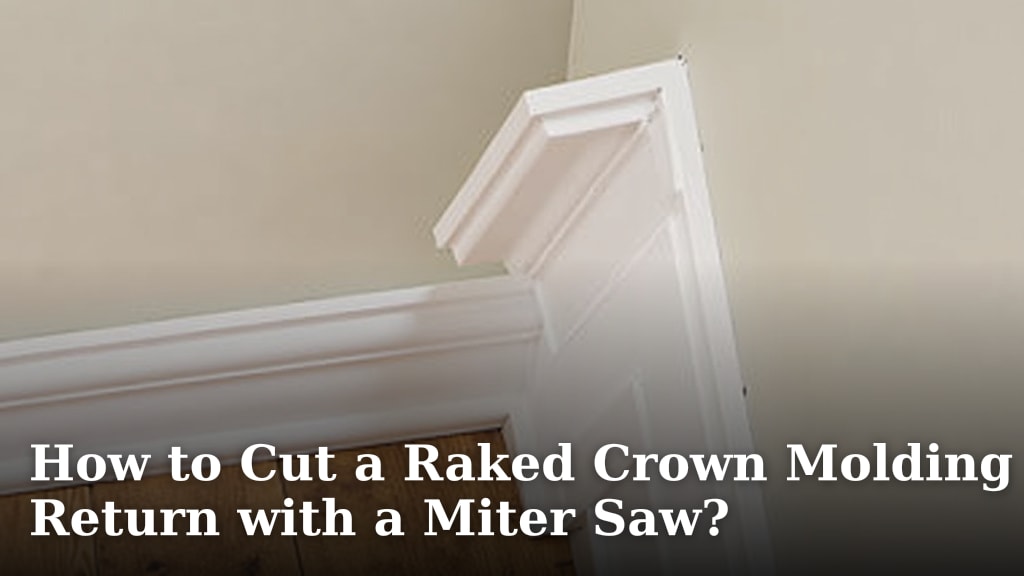
Cutting a raked crown molding return with a miter saw is totally doable. You just need to set your saw to the correct compound angle. It might seem tricky at first, but with the right measurements and saw settings, you can achieve a clean, professional look.
Many DIYers find this a challenging step in crown molding installation. Getting the angles right is key to avoiding gaps and ensuring your molding looks like it’s seamlessly flowing around a corner. We’ve found that a bit of practice makes a huge difference. This technique is essential for a polished finish.
- Understand your saw’s bevel and miter settings.
- Measure carefully to determine the correct angles.
- Practice on scrap pieces before cutting your final molding.
- A compound cut is necessary for a raked return.
Let’s walk through exactly how to set up your miter saw to tackle this tricky cut. We’ll break it down step by step so you can get it right.
Mastering the Miter Saw for Raked Crown Molding Returns
Cutting a raked crown molding return is a skill that makes a big difference. It’s that satisfying corner where the molding appears to flow perfectly. You’ll need to set your miter saw to specific angles. This isn’t your everyday 90-degree cut. We found that understanding your saw’s capabilities is step one.
Understanding Your Miter Saw’s Capabilities
Your miter saw has two main adjustments: the miter angle and the bevel angle. The miter angle changes the fence-to-blade position. The bevel angle tilts the blade itself. For a raked crown molding return, you’ll be using both. Many DIYers get tripped up here. They might adjust only one setting. Research indicates that a A compound miter saw is essential for making these angled cuts.compound cut is essential for this specific task.
Miter Angle Basics
Think of the miter angle as turning left or right. It’s how your cut is angled across the width of the molding. Most miter saws go from 0 to 45 degrees in either direction. For standard inside or outside corners, you’ll often use a 45-degree miter setting. This creates a clean 90-degree joint when two pieces meet.
Bevel Angle Basics
The bevel angle is the tilt of the blade. This changes the angle from the top of the molding to the bottom. Most saws tilt to 45 degrees in one direction. Some tilt to both sides. A raked return requires the blade to be tilted. This tilt allows the molding to meet itself at an angle.
The Compound Cut Explained
A compound cut is simply a cut made with both a miter and a bevel angle. For a raked return, you need this combination. It’s what allows the molding to make that “return” turn. Imagine a piece of molding that needs to turn back on itself. It can’t just be a straight miter cut. We found that many first-time installers struggle with this concept.
Determining the Correct Angles for Your Raked Return
So, what are those magic numbers? For a standard 90-degree wall corner, the outside return angle is typically achieved with a 31.6-degree miter cut and a 33.9-degree bevel cut. These aren’t round numbers, and that’s okay! The exact angles can vary slightly based on your molding profile and specific wall angles. It’s always best to measure and test. We recommend checking manufacturers’ guidelines for your specific molding.
Inside vs. Outside Returns
The angles are slightly different for inside and outside corners. For an inside corner return, you’ll usually adjust your saw for a cut that turns away from the corner. For an outside corner return, you’ll set your saw to turn towards the corner. Getting these directions wrong means your molding won’t meet correctly. Many guides suggest drawing out your corner first.
Measuring Your Wall Angles
If your walls aren’t exactly 90 degrees, your angles will change. You can use an angle finder or a framing square to measure your corner. For instance, a 45-degree corner would require different settings than a 90-degree corner. We found that using a digital angle finder makes this process much simpler and more accurate.
Setting Up Your Miter Saw for the Cut
This is where the magic happens. You need to set both your miter and bevel adjustments. Always ensure your saw is unplugged when making adjustments to the blade guard or setting the saw itself. Safety first, always!
Step-by-Step Saw Setup
- Set the Bevel Angle: For most common crown molding installations, the bevel angle is usually around 33.9 degrees. Ensure the saw is tilted in the correct direction for your specific return.
- Set the Miter Angle: The miter angle is often around 31.6 degrees. Again, check the direction. This angle determines how the molding “returns” on itself.
- Lock Your Settings: Once you have the angles set, make sure to lock them firmly in place. A loose setting can lead to a bad cut.
The Cutting Process: Tips for Success
Now that your saw is set, it’s time to make the cut. Precision is key here. Don’t rush the process. Many people find practicing on scrap pieces is a lifesaver.
Positioning the Molding Correctly
Crown molding is often cut at an angle when installed. This means when you cut a return, you’ll typically be cutting it upside down and backward. Place the molding on your saw’s base with the top edge against the fence. Ensure the molding’s profile sits flat against the saw’s table. Many manufacturers provide diagrams for this exact positioning.
Making the Cut
With the molding secure and your settings double-checked, make the cut. Let the saw do the work. Don’t force the blade. Once the cut is complete, carefully remove the molding. Inspect the cut edge for smoothness and accuracy. We found that a sharp blade makes a significant difference in cut quality.
Practice Makes Perfect: Using Scrap Wood
Before you touch your final molding pieces, grab some scrap. Set up your saw and make a few practice cuts. This allows you to get a feel for the angles. You can test the fit without wasting expensive material. If the fit isn’t perfect, you can easily tweak your saw settings. We highly recommend this step to build confidence.
Test Fit Your Cuts
After your practice cuts, try fitting the pieces together. Do they meet cleanly? Are there any gaps? This is your chance to make adjustments. You might need to slightly increase or decrease a miter or bevel angle. This simple test fit can save you a lot of headaches later on.
Common Mistakes to Avoid
Even with the right instructions, mistakes can happen. Being aware of them can help you avoid them.
Incorrect Saw Setup
The most common error is misinterpreting the miter and bevel angles. Some saws have different detents or markings. Double-check that you’re setting the correct angle for the correct axis. We found that writing down the angles and checking them against the saw is a good habit.
Wrong Molding Orientation
Remember, crown molding is usually cut upside down and backward. If you place it in the standard position, your angles will be completely wrong. Always orient your molding as if it were installed on the wall, but on the saw.
Ignoring Test Cuts
Skipping the practice cuts is a risky move. It’s like baking a cake without tasting the batter. You might end up with an unexpected result. We’ve seen many DIYers regret skipping this step.
Poor Measurement Skills
If your wall corners aren’t true 90-degree angles, your standard saw settings won’t work. Invest in a good angle finder. Accurate measurements are the foundation of accurate cuts. This is something many experienced carpenters stress.
Checklist for a Successful Raked Return Cut
- Confirm wall angles before setting your saw.
- Set the correct bevel angle (often 33.9 degrees).
- Set the correct miter angle (often 31.6 degrees).
- Orient molding upside down and backward on the saw.
- Make test cuts on scrap material.
- Test fit your pieces before cutting the final molding.
Conclusion
You’ve now got a solid understanding of how to cut a raked crown molding return with your miter saw. Remember, the key is setting the correct compound angles and orienting your molding properly. We’ve seen that precise measurements and practice on scrap wood are non-negotiable for a clean finish. Don’t be discouraged if your first few cuts aren’t perfect; that’s part of the learning process. Once you nail these cuts, your crown molding installation will look incredibly professional.
Your next step is to grab some scrap molding and set up your saw. Make a few practice cuts, test the fit, and make any small adjustments needed before you tackle your final pieces.
Frequently Asked Questions
What is a raked crown molding return?
A raked crown molding return is the piece of molding that turns back on itself, creating a finished edge where the crown molding meets a wall or corner. It gives the appearance of the molding flowing seamlessly around the corner.
Can I use a standard miter saw for this cut?
Yes, you can use a standard miter saw, but it must be capable of making compound cuts. This means it needs both a miter (horizontal angle) and a bevel (vertical tilt) adjustment. A basic miter saw without a bevel function won’t work for this.
Why do I need to cut crown molding upside down and backward?
Most crown molding is installed at an angle between the wall and ceiling. Cutting it upside down and backward on the saw mimics this installed position, allowing you to use the saw’s fence as a guide for accurate compound angle cuts.
What happens if my wall corners aren’t exactly 90 degrees?
If your wall corners deviate from 90 degrees, your saw’s miter and bevel settings will need to be adjusted accordingly. You’ll need to measure the actual wall angle using an angle finder and calculate the correct compound angles for your saw.
How do I know if my practice cut is correct?
A correct practice cut will fit snugly and cleanly against another molding piece when you do a test fit. There should be no visible gaps along the joint where the two pieces meet. If you see gaps, your saw’s angles might need slight adjustments.
