How to Cope Crown Molding Instead of Mitering?
On this page (3 sections)
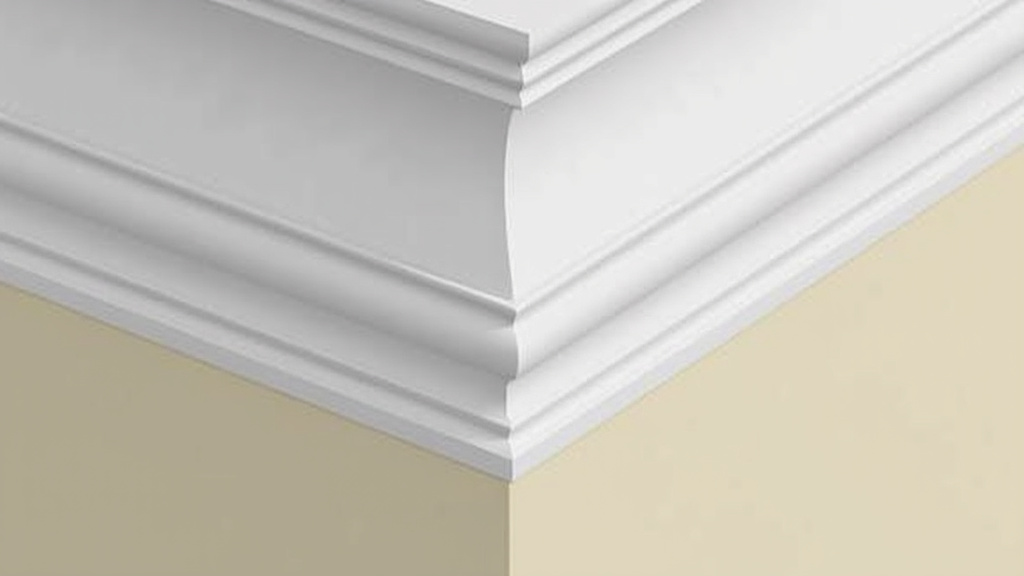
Yes, you absolutely can cope crown molding without mitering for a beautiful finish. This technique, often called “coping,” is a smart way to handle inside corners. It’s a trusted method used by many pros for a clean look. You’ll find it simpler than constantly getting perfect angled cuts.
Instead of precisely cutting two pieces of molding at a 45-degree angle, coping involves cutting one piece to fit the shape of the other. This accounts for walls that aren’t perfectly square. It’s a trick to achieve professional results even if your walls have quirks. Many homeowners find this approach less frustrating than traditional mitering.
TL;DR:
- Coping crown molding is a viable alternative to mitering.
- It creates a neat finish for inside corners, especially uneven ones.
- One piece is shaped to fit the contour of the other.
- This method is often easier and more forgiving than complex miters.
Ready to give it a try? Let’s walk through exactly how this works step by step, making your molding project much smoother.
Mastering Crown Molding: The Art of Coping Inside Corners
You’ve tackled the straight runs of crown molding. Now you’re facing an inside corner. This is where many DIYers get a bit nervous. Mitering inside corners perfectly requires precision. Small errors can make a big difference. But what if there was a way to make this easier? Coping is that way. It’s a method that allows you to create a professional-looking seam without needing perfectly square walls. We’re going to show you how to do it.
Why Cope Instead of Miter Inside Corners?
You might be wondering why you’d choose coping over mitering for inside corners. It boils down to a few key advantages. First, coping is much more forgiving. Walls are rarely perfectly square. They can bow in or out. Mitering assumes a perfect 90-degree angle. If your walls aren’t exactly that, your mitered corners will have gaps. Coping, on the other hand, allows one piece of molding to fit the contours of the other. This means it can adapt to imperfect walls.
Many professionals prefer coping for this reason. It’s a reliable way to achieve a clean, tight fit. It also looks incredibly professional. Once you’ve done it a few times, you’ll find it’s not as difficult as it first appears. It requires a different set of tools and a slightly different approach, but the payoff is worth it.
Tools and Materials You’ll Need
Before you start cutting, let’s make sure you have everything on hand. Having the right tools makes the job much smoother. You’ll need your crown molding, of course. Make sure you have a little extra for practice cuts and potential mistakes. You’ll also need a good quality coping saw. This is the most important tool for this job. A fine-toothed blade is best for clean cuts.
You’ll also need a miter saw or a hand saw with a miter box. For the saw steps, see our crown molding coping guide. While you’re not making the final corner cut with the miter saw, you’ll use it to make the initial setup cuts. Safety glasses are a must. You’ll also want a pencil for marking, a tape measure, and sandpaper for smoothing any rough edges. Some wood filler or caulk might be handy for those tiny imperfections that might still occur.
Essential Tools Breakdown
- Coping Saw: Look for one with a comfortable handle and an adjustable frame.
- Miter Saw (or Miter Box & Hand Saw): For the initial 45-degree cuts.
- Safety Glasses: Protect your eyes from sawdust and debris.
- Pencil: For marking your cut lines.
- Tape Measure: For accurate measurements.
- Sandpaper: Medium and fine grit for smoothing edges.
- Wood Filler/Caulk: For final touch-ups.
The Coping Process: Step-by-Step Guide
Let’s get down to business. The first step is crucial. You need to prepare your molding pieces. For an inside corner, you’ll be coping the second piece. The first piece will be a simple miter cut. But not a perfect 90-degree miter. It needs to be cut at a 45-degree angle, angled towards the wall it will attach to.
Step 1: The Initial Miter Cut
Take your first piece of crown molding. You’ll want to place it on your miter saw as if you were cutting a standard inside corner miter. This means the long point of the angle will face into the room. Set your saw to 45 degrees. The cut should go away from the wall, meaning the cut edge will be visible on the back of the molding when installed. This cut might seem counterintuitive, but it sets up the second piece perfectly for coping.
Step 2: Preparing the Second Piece for Coping
Now for the star of the show: the second piece of molding. This one also gets a 45-degree miter cut, but the direction is different. This cut should be angled towards the wall. Think of it this way: you’re cutting off the corner that will go into the wall, creating a sharp edge. The long point of this 45-degree angle will be against the wall.
This cut is essential for creating the profile that you’ll be coping. Once this miter cut is made, you’ll have a piece that looks like it’s ready to join another piece. But instead of joining, it’s preparing to be shaped.
Step 3: Cutting the Coping Profile
This is where the coping saw comes in. Take the second piece of molding, the one you just mitered at 45 degrees towards the wall. Now, you need to place it on your saw, but not flat. You’ll be holding it against the fence of your miter saw, exactly how you would if you were cutting a 90-degree outside corner miter. This is the trick! You’re essentially making a miter cut in reverse.
Set your miter saw to 45 degrees, but this time, you’re cutting away from the main body of the molding. This cut should follow the contour of the molding. You are trying to cut out the waste material, leaving only the shaped edge that will nestle against the first piece.
Step 4: Sawing the Cope Line
Gently push your molding against the saw blade. You want to cut just inside the line you’ve created with the miter cut. The goal is to create a thin, concave edge. This edge will perfectly match the convex profile of the first piece of molding. Imagine you’re cutting away a sliver of the wood, following the shape of the molding’s face. Take your time here. It’s better to cut too little and refine than to cut too much.
Many people find it helpful to lightly sketch a line inside the miter cut to guide their coping saw. This line represents the waste material you need to remove. Let the saw do the work. Don’t force it. A sharp blade will make this process much easier and cleaner.
Step 5: Fitting and Adjusting
Once you’ve made your cope cut, test fit the piece. It should sit snugly against the first mitered piece. If there are any tight spots or small gaps, you can use your coping saw to carefully shave away a little more material. A small rasp or even sandpaper can help with fine adjustments.
Look for high spots where the two pieces meet. Gently sand or shave these down until the seam is tight. You’re aiming for a connection that looks almost like a single, continuous piece of molding. This might take a few tries to get perfect, and that’s okay. Remember, you have that extra molding for practice!
Comparing Mitering vs. Coping for Inside Corners
It’s helpful to see how these two methods stack up against each other. Understanding the pros and cons can help you decide which is best for your specific project. Many sources, like woodworking guides, often highlight the learning curve associated with both techniques.
| Feature | Mitering Inside Corners | Coping Inside Corners |
|---|---|---|
| Wall Imperfections | Requires perfectly square walls for a tight fit. Gaps are common with imperfect walls. | Adapts well to slightly out-of-square walls, creating a tighter seam. |
| Complexity | Requires precise 45-degree cuts. Small errors lead to visible gaps. | Requires an initial miter cut and a detailed cope cut with a coping saw. |
| Tooling | Primarily needs a miter saw. | Needs a miter saw and a coping saw. |
| Learning Curve | Can be frustrating to achieve perfection on uneven walls. | Can be challenging to master the coping saw technique initially, but often more forgiving. |
| Professional Finish | Excellent when walls are perfect. | Consistently provides a high-quality, professional finish, even with minor wall imperfections. |
Tips for Achieving a Flawless Cope Every Time
Even with the forgiving nature of coping, a few extra tips can make your work look even better. First, practice makes perfect. Don’t start on your most visible corner. Get a feel for the coping saw on scrap pieces. You’ll quickly learn how much pressure to apply and how to follow the curves.
Always cut your cope slightly proud, meaning a little bit of extra material. It’s much easier to shave down a small amount than to add material back. Use a sharp blade in your coping saw. A dull blade will snag and tear the wood, leading to a rougher finish that’s harder to clean up. When fitting, focus on getting the tightest possible fit. You want the pieces to look like they’re kissing, not fighting!
Pre-Installation Checklist
- Ensure you have extra molding for practice cuts.
- Confirm your coping saw has a sharp, fine-toothed blade.
- Practice coping on scrap pieces until comfortable.
- Double-check your 45-degree miter cuts on both pieces.
- Fit the coped piece to ensure a tight seam before final installation.
- Have sandpaper or a small rasp ready for minor adjustments.
When to Consider Mitering Instead
While coping is fantastic for inside corners, there are times when mitering might still be the better choice. If you are absolutely certain your walls are perfectly square and your measurements are precise, a mitered corner can be very clean. Also, for outside corners, mitering is almost always the preferred method. Coping an outside corner is significantly more difficult and rarely yields a good result.
Research from carpentry manuals often shows that consistent, crisp 45-degree miters are the hallmark of a clean finish when conditions are perfect. However, for the vast majority of homes, coping offers a more achievable and resilient solution for inside corners. It’s about choosing the right technique for the job, and for most inside corners, coping is your best bet.
Conclusion
You’ve learned that coping crown molding for inside corners is a fantastic alternative to mitering. It’s a forgiving technique that handles imperfect walls beautifully. You now have the knowledge to prepare your molding, make those essential cuts, and achieve a professional, gap-free seam. Don’t be afraid to practice the coping saw technique on scrap pieces. Once you’ve got the hang of it, you’ll find it’s a more reliable way to get a stunning finish in your home. Ready to tackle those corners with confidence?
Frequently Asked Questions
Is coping really easier than mitering for crown molding?
For inside corners, many find coping easier once they get the hang of it. Mitering requires perfectly square walls, which are rare. Coping allows you to shape one piece to fit the contour of the other, making it more forgiving with imperfect walls.
What’s the most important tool for coping crown molding?
The most critical tool you’ll need is a good quality coping saw. Look for one with a comfortable grip and a fine-toothed blade. This tool allows you to make the precise, curved cuts needed to create the fitting profile.
Can I use a regular hand saw to cope crown molding?
While you can use a hand saw with a miter box for the initial miter cuts, a standard hand saw is not ideal for the actual coping cut. A coping saw’s thin blade and maneuverability are essential for cutting the molding’s profile accurately.
How do I know if I’ve cut the cope correctly?
The best way to tell is by fitting the piece. It should sit snugly against the other piece of molding with no visible gaps. If there’s a slight high spot, you can carefully shave it down with your coping saw or a fine-grit sandpaper.
What if my cope cut isn’t perfect on the first try?
Don’t worry! It’s very common. The beauty of coping is that you can often make minor adjustments. You can carefully shave down high spots or use a small amount of wood filler or caulk for tiny imperfections before painting.