How To Build A Mobile Miter Saw Station?
Building a mobile miter saw station means creating a compact, wheeled workbench that securely holds your miter saw, offers extended support wings for longer materials, and provides essential storage, allowing you to move your workspace easily around your shop or even to job sites.
You can construct a sturdy mobile miter saw station using materials like plywood or MDF, typically integrating locking casters, folding wing supports, and built-in drawers or shelves to maximize functionality and portability for your woodworking projects.
TL;DR: Ready to tackle that mobile miter saw station project? Here’s the quick rundown:
- A mobile station brings your workspace to you, saving time and space.
- Prioritize stability, portability, and integrated dust collection in your design.
- Basic materials like plywood or MDF, along with common hardware, will get the job done.
- Measure twice, cut once, and always check for squareness during assembly.
- Add storage, lighting, and a power strip for a truly efficient setup.
How To Build A Mobile Miter Saw Station?
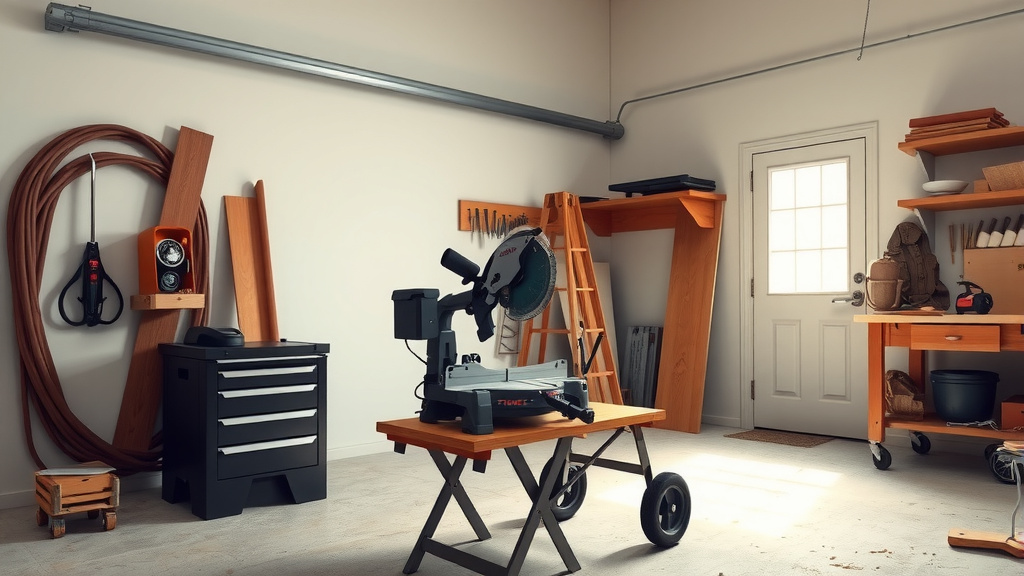
You can build a mobile miter saw station by starting with a robust base, adding a precisely sized tabletop for your saw, incorporating sturdy folding wings for material support, and installing locking casters for effortless movement around your workshop.
Why a Mobile Miter Saw Station is Your Workshop’s New Best Friend
Imagine your workshop floor; is it a maze of projects and tools? A mobile miter saw station can be a game-changer for space management. We found that many woodworkers struggle with limited space, making portability a true asset for any power tool.
Think about it: you can roll your saw to the lumber pile, make your cuts, and then tuck it away. This not only keeps your shop tidy but also creates a safer environment by reducing trip hazards and clutter. It’s like giving your miter saw its own personal, portable stage.
Reclaiming Your Workspace
Does your miter saw always seem to occupy a prime spot, even when not in use? A mobile station lets you reclaim that valuable floor space. You gain flexibility, using the same area for different tasks throughout your day, keeping your workflow smooth.
Planning Your Mobile Miter Saw Station: The Blueprint for Success
Before you grab your first sheet of plywood, taking some time to plan is smart. Many experts say that a good plan saves materials and frustration later (Wood Magazine). What do you need your station to do? Where will it live?
Consider the size of your miter saw. You will need to account for its base dimensions and any sliding rails. Also, think about the longest piece of material you typically cut. This helps determine the length of your support wings.
Key Considerations for Your Design
- Saw Clearance: Ensure your saw blades and dust port have enough room.
- Material Support: Design wings that align perfectly with your saw’s bed height.
- Storage: Will you need drawers, shelves, or cubbies for blades and accessories?
- Dust Collection: How will you integrate a dust port or collection system?
- Mobility: Heavy-duty locking casters are a must for stability and easy movement.
Gather Your Gear: Essential Materials and Tools
You don’t need exotic materials to build a great mobile miter saw station. The beauty is in its practicality. We found that plywood and MDF are popular choices due to their stability and workability.
Think about what you already have in your workshop. Can you reuse some scraps? Or is it time for a trip to your local hardware store? Here’s a basic list to get you started on this exciting project.
Materials Checklist
- Plywood (3/4-inch and 1/2-inch for strength and lighter components)
- 2x4s or similar lumber for framing (optional, but adds rigidity)
- Locking swivel casters (4-6 depending on size and weight)
- Wood glue and wood screws
- Drawer slides (if adding drawers)
- Hinges for folding wings
- T-track (optional, for clamps)
- Dust collection fittings
Tools You’ll Need
This project is a great way to use many of your existing workshop tools. You’ll be doing a lot of measuring and cutting, so accuracy is key. Remember, safety first with all power tools.
| Tool Type | Primary Use |
|---|---|
| Circular Saw or Table Saw | Precise sheet goods cutting |
| Drill/Driver | Drilling pilot holes, driving screws |
| Tape Measure & Square | Accurate layout and marking |
| Router (optional) | Edge banding, dadoes for shelves |
| Clamps | Holding pieces for gluing/screwing |
Step-by-Step Construction: Bringing Your Station to Life
Now for the fun part: assembly! Remember the old adage, “measure twice, cut once.” This is particularly true when building a station that needs to be square and stable for your saw.
Building the Base Cabinet
Start with the main carcass. Cut your side panels, top, and bottom. Many designs feature a simple box construction, which provides maximum stability. We found that dado joints and screws work well for strong connections.
Once the main box is assembled, attach your locking casters to the bottom. Position them towards the corners for stability. Test the movement; does it roll smoothly? Do the locks hold it firm?
Crafting the Miter Saw Platform
This is where your saw will sit. Cut a piece of plywood that fits inside the top of your base cabinet. You want this platform to be just below the height of your saw’s base. The goal is for your saw’s bed to be perfectly level with the extension wings you’ll add next. This creates a seamless, level work surface.
Installing the Outfeed Support Wings
These wings are critical for supporting long materials. Cut your wing pieces to match the depth of your saw bed. Attach them to the sides of your main cabinet using sturdy hinges. You’ll need supports for these wings, which can be folding legs or retractable arms. Research shows that level wings improve cut accuracy significantly (Fine Woodworking).
Adding the Finishing Touches: Storage and Dust Collection
Your mobile miter saw station isn’t just about holding the saw; it’s about making your work easier. Consider adding storage solutions to keep your blades, pencils, and safety glasses close at hand. A few small drawers or open shelves can make a world of difference.
Dust collection is another important addition. Miter saws produce a lot of sawdust. Integrate a dust port adapter and route it to a shop vacuum or dust collector. Your lungs will thank you!
Making Your Station Truly Yours
Beyond the basics, what else could improve your workflow? Maybe a built-in power strip for your saw and a shop light? Or even a small clamp rack on the side? These small details can personalize your workspace and boost your efficiency.
Safety First: Working Smart with Your New Station
A mobile station makes your work more efficient, but safety remains paramount. Always double-check that your saw is securely fastened to the platform. Ensure your extension wings are locked in place before making cuts.
When moving your station, make sure the path is clear. Engaging those locking casters before starting any cut prevents dangerous wobbling. A stable platform means safer and more accurate cuts every time.
Conclusion
Building your own mobile miter saw station is a rewarding project that truly transforms your woodworking experience. You gain unparalleled flexibility, reclaim valuable workshop space, and enhance your overall efficiency. By carefully planning your design, gathering the right materials, and focusing on precision during construction, you can create a sturdy, functional, and personalized workspace. This station isn’t just a piece of furniture; it’s a testament to your craft and a smart investment in your productivity.
FAQs About Building a Mobile Miter Saw Station
What materials are best for building a sturdy mobile miter saw station?
Plywood (especially 3/4-inch Baltic Birch or hardwood plywood) and MDF are excellent choices for their stability and durability. Plywood offers good screw retention, while MDF provides a very smooth surface. Using 2x4s for internal framing can add extra rigidity.
How do I ensure my miter saw station’s extension wings are perfectly level with the saw bed?
Accurate measurement is key. Set your miter saw on its platform. Then, use a straight edge or a long level placed across the saw’s bed and onto where the wing will be. Adjust the height of your wing supports or build up the surface until it’s perfectly flush with the saw bed, often using shims or careful cutting.
What kind of casters should I use for a mobile miter saw station?
Heavy-duty locking swivel casters are highly recommended. Look for ones with a weight rating that comfortably exceeds the combined weight of your station, saw, and any materials you might place on it. The locking mechanism is crucial to prevent the station from moving during operation, ensuring safety and precision.
Can I integrate dust collection into my mobile miter saw station?
Absolutely, and you should! Many designs incorporate a dedicated enclosure or shroud behind the saw’s dust port to capture more sawdust. You can then connect this to a shop vacuum or larger dust collection system via flexible hose, making cleanup much more efficient and improving air quality.
How important is stability for a mobile miter saw station, even though it’s on wheels?
Stability is paramount. While mobility is a primary feature, the station must be rock-solid when in use. This means using strong joinery, ensuring the casters lock securely, and designing the base wide enough to prevent tipping, especially when supporting long or heavy workpieces on the extension wings. A stable station leads to safer and more accurate cuts.