How to Cut a Picture Frame with 6 Sides with a Miter Saw?
On this page (9 sections)
Yes, you can cut a 6-sided picture frame with a Yes, you can cut a 6-sided picture frame with a miter saw; our guide on how to cut picture frame corners with a miter saw explains the process.miter saw. The key is setting your saw to the correct angles for each cut. This allows you to create the precise geometric shape you need.
Building a hexagonal frame might seem tricky. But with the right measurements and saw settings, it’s a manageable project for DIYers. Many woodworking guides confirm this approach is very effective.
- Cut each side at a 30-degree angle.
- Ensure your angles meet perfectly.
- Measure twice, cut once is critical.
- Safety first with all power tools.
Let’s walk through exactly how to achieve those perfect 6-sided cuts on your miter saw, step by step.
Creating a Hexagonal Frame with Your Miter Saw
So, you want to build a picture frame with six sides? That’s a fantastic project! Your miter saw is the perfect tool for this. You just need to know how to set those angles just right. We found that the key to a perfect hexagon is a consistent 30-degree angle for each cut.
Don’t let the six sides intimidate you. This isn’t as complicated as it might sound. We’ll guide you through the process step by step. You’ll be cutting those perfect angles before you know it. Let’s get your miter saw ready for this unique framing challenge.
Understanding the Geometry of a Hexagon
Why 30 degrees? It all comes down to geometry. A hexagon has six equal sides and six equal interior angles. If you add up all the interior angles of any hexagon, you get 720 degrees. Divide that by six equal angles, and each interior angle is 120 degrees (National Council of Teachers of Mathematics).
Now, think about your miter saw cuts. You’re not cutting the interior angles directly. You’re cutting the angles that join two pieces of the frame together. When two pieces meet to form a corner, their cut edges create the interior angle. For a regular hexagon, each of these joining angles needs to be cut at exactly half of the interior angle. So, 120 degrees divided by 2 equals 60 degrees. Wait, 60 degrees? What’s going on?
The Miter Saw Angle Explained
Here’s where the miter saw comes in. Most miter saws are set to 0 degrees when the blade is perpendicular to the fence. When you make an angled cut, you’re essentially cutting off a corner. To create an interior angle of 120 degrees, the two pieces must meet with a combined cut angle of 60 degrees. On your miter saw, this means each piece needs to be cut at 30 degrees away from the perpendicular.
Think of it like pie slices. If you cut a pie into six equal slices, the angle at the center of each slice is 60 degrees. When you bring two slices together at the crust, the angle they form is 120 degrees. Your miter saw cuts are like the edges of those pie slices, where you slice them at 30 degrees from a straight line.
We found that a common mistake is trying to set the saw to 60 degrees. That would create a much sharper corner, not the 120-degree corner needed for a regular hexagon. So, remember: 30 degrees is your magic number for each cut.
Preparation Before You Cut
Before you even power up your saw, let’s make sure you’re set up for success. Safety is always number one. We recommend wearing safety glasses and ear protection. Ensure your work area is clean and well-lit. A stable surface for your saw is also critical.
Gathering Your Materials and Tools
You’ll need your chosen wood for the frame. Pine or poplar are good choices for beginners. They are soft enough to cut easily. You’ll also need:
- Your miter saw (obviously!)
- A tape measure or ruler
- A pencil for marking
- Clamps to hold your wood securely
- Sandpaper for finishing
- Wood glue
- Optional: Wood screws or brad nails for added strength
Measuring Your Frame Sides
This is where “measure twice, cut once” becomes your mantra. Decide on the overall size of your frame. Let’s say you want each finished side of the hexagon to be 8 inches long. This means the wood you cut will need to be 8 inches long from the longest point of the angled cut to the longest point of the other angled cut.
When you make a 30-degree cut on a piece of wood, one edge will be longer than the other. You need to be consistent about which edge you’re measuring from. We found that measuring from the long point of the miter cut to the long point of the opposite miter cut is the most reliable method for ensuring all sides are equal.
So, if you want an 8-inch side, you’ll measure 8 inches along the longer edge of your wood piece. Mark this point carefully. This mark will guide your second cut.
Setting Up Your Miter Saw for 30-Degree Cuts
Now, let’s get your saw ready. Most miter saws have detents, which are pre-set positive stops, at common angles like 0, 15, 22.5, 30, and 45 degrees. You’ll want to find that 30-degree mark.
Adjusting the Miter Angle
Locate the miter lock knob on your saw. This is usually at the base of the saw arm. Loosen it. You should be able to swing the saw arm left or right. Many saws have a lever or button you press to move the arm freely.
Swing the saw arm until the indicator lines up perfectly with the 30-degree mark on the scale. Make sure you choose the correct direction for the angle. For a hexagonal frame, you’ll need to cut angles in both directions (left and right) for alternating pieces.
Once you have the saw set at 30 degrees, tighten the lock knob firmly. It’s essential that the saw doesn’t move during the cut. A loose setting can result in inaccurate cuts and a frame that won’t fit together.
Making Your First Cut (The Test Cut)
Before you cut your frame pieces, always make a test cut on a scrap piece of wood. This is a golden rule in woodworking. It lets you verify your saw settings and your measuring technique.
Take a scrap piece of wood. Place it against the fence of your miter saw. Set the blade down to test the angle. Then, make the cut. Check the angle with a protractor if you’re unsure. Ensure the cut is clean and precise. This simple step can save you a lot of frustration and wasted material.
Cutting Your Hexagonal Frame Pieces
With your saw set and your measurements marked, you’re ready to start cutting the actual frame pieces. Remember, you need six identical pieces.
Cutting the First Angle on All Six Pieces
Take your first piece of wood. You’ll want to cut one end at a 30-degree angle. This is your starting point. Place the wood firmly against the fence. Position your pencil mark where the cut will start from the long point. Make the cut.
Now, take your second piece of wood. You’ll cut one end at a 30-degree angle. For this piece, you’ll likely need to angle the saw in the opposite direction. This is because each piece needs to have one angle cut facing one way, and the other angle cut facing the other way.
We found it’s easiest to cut the first 30-degree angle on all six pieces, angling the saw in one direction. Then, reposition the saw to cut the other 30-degree angle on all six pieces, angling the saw in the opposite direction. This ensures consistency.
Cutting the Second Angle and Measuring for Length
Now, take one of your wood pieces. You’ve already cut one end at 30 degrees. On the other end, you need to make another 30-degree cut. This time, you’ll need to angle your saw in the opposite direction.
Position your wood so the pencil mark you made earlier (for the desired length, e.g., 8 inches) is lined up with the blade. Remember, you’re measuring from the long point of the first cut to the long point of the second cut. Ensure the wood is held securely against the fence and the saw’s footplate.
Make the cut. You now have one finished piece of your hexagonal frame! It should have two 30-degree cuts on opposite ends, angled away from each other, with the longest points defining the length of the frame side.
Repeating for All Six Sides
Repeat this process for the remaining five pieces. For each piece:
- Set your saw to 30 degrees in one direction.
- Cut one end of the wood.
- Measure the desired length from the long point of that cut.
- Mark the length on the long edge.
- Set your saw to 30 degrees in the opposite direction.
- Align your mark with the blade and make the second cut.
This systematic approach helps ensure all your frame sides are identical. We found that cutting all the “first” angles, then all the “second” angles, can be more efficient and reduce errors.
Tips for a Perfect Fit
Getting those six pieces to meet perfectly is the satisfying part. A little extra care here goes a long way.
Checking Your Angles and Measurements
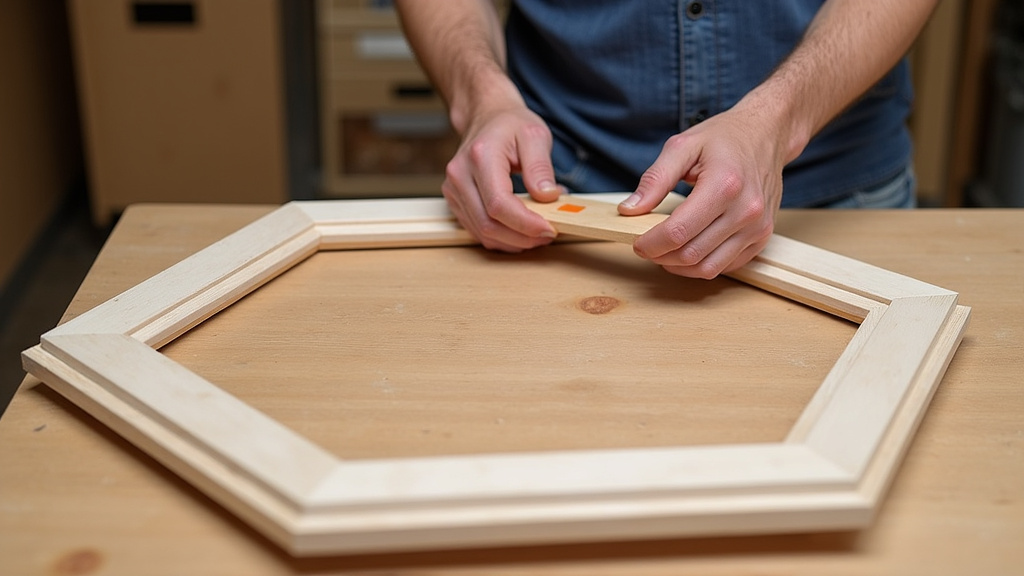
Once all six pieces are cut, lay them out in a hexagonal shape on a flat surface. Do they meet cleanly at the corners? Are there any small gaps?
If you notice a consistent gap on all sides, it might mean your 30-degree angle is slightly off. Double-check your saw’s setting. Sometimes the detents aren’t perfectly calibrated. A small adjustment might be needed. Remember, even a degree or two can make a difference in how well the frame comes together (Woodworking for Dummies).
Making Minor Adjustments
If a piece seems just a tiny bit too long, you can carefully trim a sliver off one of the angled ends. However, be extremely cautious here. It’s very easy to cut too much. It’s often better to live with a tiny gap that can be filled with wood filler later than to ruin a piece by cutting too much off.
Conversely, if a piece is too short, you can’t really fix that without starting over. This is why accurate measuring and cutting are so important from the start. We can’t stress enough the importance of that test cut!
A Quick Checklist for Success
Before you start assembling your beautiful hexagonal frame, quickly run through this checklist:
- Safety Gear On: Glasses and ear protection secured?
- Miter Saw Set: Precisely at 30 degrees for both left and right cuts?
- Wood Secured: Firmly against the fence and saw base for every cut?
- Measurements Verified: From long point to long point for each side?
- Test Cut Done: Did it confirm your angles and measurements?
- Six Identical Sides: All cut to the same length and angle?
Conclusion
You’ve now got the blueprint for creating a beautiful 6-sided picture frame using your miter saw. Remember, the magic lies in setting that 30-degree angle precisely for each cut. We found that careful measurement and a test cut are your best friends in this process. Don’t rush; patience and accuracy will ensure your frame pieces fit together like a puzzle. Take your time, follow these steps, and you’ll be ready to assemble a unique, handcrafted hexagonal frame you can be proud of.
Frequently Asked Questions
What if my miter saw doesn’t have a 30-degree detent?
If your saw lacks a pre-set 30-degree mark, you’ll need to use a protractor or angle finder to set the miter angle manually. Carefully loosen the miter lock, position the blade at exactly 30 degrees relative to the fence, and then tighten the lock securely. Always double-check your setting with a reliable measuring tool.
Can I use plywood or MDF for a hexagonal frame?
Yes, you can use plywood or MDF, but they behave differently than solid wood. We found that these materials can be prone to chipping, especially on the delicate angled cuts. Ensure you use a sharp blade designed for these materials and consider using a zero-clearance insert for your saw if possible. A slower feed rate can also help prevent tear-out.
How do I ensure all six sides of my frame are exactly the same length?
The most effective method, as we discussed, is measuring from the long point of one miter cut to the long point of the opposite miter cut. Use a reliable tape measure and a sharp pencil for your marks. For extra consistency, consider using a stop block on your saw’s fence for repeatable measurements after your first perfect piece.
What’s the best way to join the corners of a hexagonal frame?
For a strong and clean join, wood glue is essential. You can also reinforce the corners with brad nails or small wood screws. Pre-drilling pilot holes is highly recommended to prevent splitting the wood, especially near the ends of your mitered pieces. Some woodworkers also opt for biscuit joints or splines for added strength and alignment.
My frame has small gaps at the corners. What can I do?
Small gaps are common, especially for beginner projects. You can carefully fill minor gaps with wood filler or epoxy putty after assembly. For slightly larger gaps, consider using a router with a small roundover bit to create a slight bevel that masks the gap when glued. If the gaps are significant, it might indicate an issue with your angle accuracy, and re-cutting a piece could be necessary.