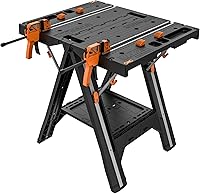
How to Attach a Miter Saw to a Keter Workbench
To fix a miter saw to a Keter work bench, check the bench model and saw manual first, then secure the saw only with compatible hardware on a stable surface. If the bench has no mounting points that safely match the saw, use a separate saw stand or a plywood mounting board clamped to the bench.
On this page (8 sections)
- Can you mount a miter saw directly to a Keter workbench?
- How do you check the fit before mounting?
- What mounting methods can work?
- How do you attach and check the saw safely?
- What clamps can help with the setup?
- How can you support long boards?
- What if the bench or saw moves?
- Which setup should you choose for a Keter workbench?
To fix a miter saw to a Keter work bench, confirm the bench model supports the saw's weight and mounting method, then attach it only with hardware that fits both manuals. If the mounting points don't match or the bench shifts under pressure, use a separate saw stand or a rigid board that you can clamp securely.
Keter makes several workbench models, and their tops and mounting features can differ. Don't assume a saw will bolt directly to every Keter bench.
Can you mount a miter saw directly to a Keter workbench?
Mount it directly only when the bench surface, mounting points, and load rating suit your saw. Check the exact bench and saw manuals before drilling or tightening any fasteners.
Look for instructions about mounting holes, clamps, supported loads, and workpiece support. If the bench manual doesn't approve drilling, don't add holes; they may weaken the top or interfere with its folding or storage features.
A saw can produce movement as the blade enters and leaves the workpiece. The bench must remain stable through the cut, with the saw secured against shifting and enough room for the arm, fence, and stock.
If you need a different setup, start with what to put a miter saw on. A saw stand or a dedicated work surface may be a better fit than a portable bench.
How do you check the fit before mounting?
Measure the saw base, the bench top, and the position of every mounting point. Compare those measurements with both manuals before choosing bolts, clamps, or a mounting board.
With the saw unplugged, set it on the bench and check that all feet sit flat. Make sure the saw doesn't overhang in a way that makes the bench tip, and leave room for the saw head to move through its full range.
A sliding miter saw also needs space behind it for the rails. Check the space needed for the rails and the long stock you'll cut; our guide to choosing a sliding miter saw table covers support and clearance needs.
Don't guess at bolt length or drill through the top to make the holes line up. A fastener that is too long can interfere with parts below the surface, while a poor fit can leave the saw loose.
What mounting methods can work?
Use the mounting method allowed by the saw and bench manuals. Direct bolting is an option only when the hardware fits the bench and saw without modification the manufacturers prohibit.
When can you bolt the saw down?
Bolt the saw directly only if the mounting holes align with a suitable bench surface and the bench allows that method. Use the fasteners specified by the saw manual and make sure they don't project into moving parts or the underside of the bench.
Tighten the fasteners evenly, then check that the saw base sits flat. Don't overtighten into a plastic or composite surface, or improvise with screws that don't match the instructions.
Can a mounting board bridge mismatched holes?
A rigid board can help when the saw's mounting points don't line up with the bench, provided the board itself can be secured without making the setup unstable. The board needs enough area for every saw foot and a secure way to attach it to the bench.
Choose a flat board with no cracks or loose layers. Mark and drill the saw's mounting holes in the board, then fasten the saw according to its manual.
Clamp the board to the bench at multiple points, with clamps positioned away from the blade path, fence, and handles. A board only helps if it cannot slide, lift, or rock during use.
The IRWIN Quick-Grip C-Clamp has a 6 in clamping capacity, a 3-1/2 in throat, and a swivel pad; check that its opening and reach fit your board and bench edge.
Don't use a clamp as a substitute for the saw's required mounting hardware. If the bench's shape leaves too little edge for a firm hold, choose another support.
When is a separate stand the better choice?
Use a separate stand when the bench is too small, has no approved attachment method, or moves under the saw. A stand designed for a miter saw may also make it easier to support longer workpieces.
For a DIY alternative, see how to build a portable workbench.
The BORA Centipede Folding Work Table is a portable 2 x 4 ft work surface with a 30 in working height and included quick clamps. For a workbench you plan to roll, see retractable workbench casters.
Confirm the saw's footprint, table stability, and the specific bench setup before using it as saw support.
The Centipede's included clamps are for keeping materials in place, so don't assume they replace hardware needed to mount a saw. Follow the saw's instructions and use an approved mounting method.
How do you attach and check the saw safely?
Unplug the saw, secure the bench, mount the saw, and check for movement before cutting. Follow the saw manual's setup steps throughout.
- Set the bench on a level floor and lock or secure its legs as directed.
- Place the saw where the blade, fence, and rails have clear space.
- Attach the saw using only the approved fasteners or mounting method.
- Secure any mounting board to the bench with clamps placed clear of moving parts.
- With the saw unplugged, move the head and rails through their full travel.
- Apply light hand pressure to check for rocking, sliding, or tipping.
Don't cut if the saw or bench shifts during these checks. Reposition the setup, add a suitable support, or change to a dedicated saw stand.
Keep your hands clear of the blade area when moving the saw head. For more on setup and comfortable working height, see miter saw stand height and ergonomic workbench guidance.
What clamps can help with the setup?
Choose clamps that fit the bench edge and the job, then keep them outside the saw's moving area. Their role is to hold a mounting board or workpiece, not to compensate for a bench that is too small or unstable.
The IRWINQUICK-GRIPOne-Handed Mini Bar Clamp has non-marring pads and a quick-release trigger. Its 6 in jaw opening is for smaller workpieces and confined areas, so check the reach before relying on it for a board.
For mounting boards, choose woodworking clamps that reach around the bench and board together. Our woodworking clamps guide explains how to match clamp types to the work.
How can you support long boards?
Support long stock at the same height as the saw table, with the supports placed so the board stays level. Unsupported ends can lift or sag, which can affect control and the cut.
Use stable roller stands or other supports that don't move as the board feeds. Keep supports far enough from the blade to avoid obstructing the cut, but close enough to control the stock.
Don't use a narrow Keter tabletop as the only support for a long board if its ends can pull the saw or bench out of position. A longer workbench may suit repeated cuts better; see these miter saw and table saw workbench plans.
What if the bench or saw moves?
Stop cutting if the bench rocks, the saw shifts, or the workpiece won't stay supported. Unplug the saw and find the cause before restarting.
Check that the legs are fully set, the floor is level, clamps remain tight, and the saw's feet sit flat. If the mounting hardware has loosened or the top is damaged, don't keep using the setup.
For a saw problem beyond its mounting, see how to fix a miter saw. Don't attempt repairs on a plugged-in saw.
Which setup should you choose for a Keter workbench?
For a Keter bench with approved mounting points and a stable top, use the saw's specified fasteners and check the fit before cutting. For mismatched holes, consider a rigid board only if you can secure it firmly without drilling into a bench that prohibits it.
Choose a separate stand when the saw, bench, or stock doesn't fit securely together. Compare your options in the guide to the best miter saw bench and use a setup that stays fixed through the full cut.
Frequently asked questions
Can you bolt a miter saw to a Keter workbench?
Only if the specific Keter bench has a suitable surface and the saw's mounting points can be secured without damaging the bench. Check both manuals for approved mounting methods and load limits.
If holes or hardware don't line up, use a separate saw stand or a securely clamped mounting board instead of forcing a fit.
Can you clamp a miter saw to a Keter workbench?
You may be able to clamp a mounting board to a Keter workbench if the board and bench stay stable under the saw's weight and cutting forces. Clamp the board at several points, keep clamps clear of moving parts, and check for rocking before powering the saw.
Do not rely on a loose or narrow tabletop.
What should go between a miter saw and a workbench?
A flat, rigid mounting board can help when the saw's feet do not match the bench surface, but it must be large enough for every mounting point and firmly secured. Follow the saw manual for bolt size, placement, and clearances.
The board does not make an unstable or overloaded bench safe.
How do you check a miter saw mount before cutting?
With the saw unplugged, check that every fastener or clamp is tight and that the bench does not rock, shift, or tip when you apply light hand pressure. Move the saw head through its full range and check that the blade guard, fence, and workpiece supports have room.
Follow the manual's setup and safety checks.