How to Clamp a Picture Frame
Clamp a picture frame by aligning the 4 corners first, then applying even pressure around the frame. Check the diagonals before the glue dries so the frame stays square.
On this page (10 sections)
- What do you need before clamping a picture frame?
- How do you dry-fit a picture frame?
- What is the correct assembly order?
- How do you use a strap clamp on a picture frame?
- Should you use corner clamps or a strap clamp?
- How much pressure should you apply?
- How do you check a clamped picture frame?
- What mistakes should you avoid?
- How do you clamp a picture frame with uneven pressure?
- What is the final check before the glue dries?
Clamp a picture frame by aligning the miters, checking the corners, and applying even pressure around the full frame. The right order keeps the joints closed while the glue sets and helps prevent a frame that dries out of square.
Start with a clean, flat work surface. Dry-fit the 4 frame pieces before adding glue so you can see how the miters meet and where each clamp will sit.
What do you need before clamping a picture frame?
You need wood glue, a flat work surface, corner protection, and a clamp that reaches all 4 corners. A square, tape measure, and clean cloth also help you check alignment and remove glue squeeze-out.
If you are choosing your first clamp, our guide to woodworking clamps explains the main clamp types and where each one fits.
Have the frame pieces arranged in assembly order. Mark the inside or back of each piece lightly if the parts look similar, because turning one board around can reverse a miter.
Use scrap paper, wax paper, or another glue-resistant barrier under the frame if glue could reach your workbench. Keep the barrier flat so it doesn't push one side of the frame higher than the other.
How do you dry-fit a picture frame?
Fit all 4 corners together without glue and check the frame for square. The miters should meet across their full width, with no visible open gap at the inside or outside edge.
Measure from one corner to the opposite corner, then measure the other diagonal. Matching diagonal measurements show that the frame is square enough to clamp, while a large difference means you need to adjust the joints first.
Check the front face for steps between boards. Run a fingertip lightly across each corner, then turn the frame over and inspect the back for gaps.
If a corner does not close during the dry fit, don't expect clamping pressure to fix a poor cut. Review How To Cut A Picture Frame With A Miter Saw? if the miters need correction.
What is the correct assembly order?
The correct order is dry-fit first, apply glue second, align the corners third, check the diagonals fourth, and tighten the clamp last. This gives you time to make small adjustments before pressure locks the frame in place.
Apply a thin, even layer of glue to the mating faces of each miter. Too much glue creates extra squeeze-out and can make the parts slide as you close the joints.
Bring the 4 pieces together in their marked order. Press each corner together by hand, then wipe away glue that reaches the front face before it hardens.
Put the clamp around the frame only after the corners are seated. Tighten it gradually while watching all 4 joints, rather than tightening one area fully before the others receive pressure.
How do you use a strap clamp on a picture frame?
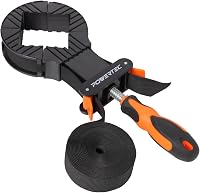
Center the strap around the outside of the frame and tighten it evenly until all 4 miters close. The corner pads should sit over the corners without covering the joint faces or pushing the frame out of alignment.
A strap clamp works well for square and rectangular frames because one band applies pressure around the complete assembly. The POWERTEC strap clamp has a 13 ft nylon band, non-marring clamping jaws, quick-release levers, and a hand screw for additional tightening.
Feed the strap around the frame without twisting it. Keep the band flat against the corner brackets, then make small adjustments until the pressure feels balanced on all 4 sides.
Check the diagonals again after tightening. If one measurement changes noticeably, loosen the clamp slightly, push the frame back into square, and retighten.
For a closer look at this setup, read How to Use a Band Clamp. You can also compare Best Band Clamps for Picture Frames if you want a clamp designed around this type of assembly.
Should you use corner clamps or a strap clamp?
Use corner clamps when you want to hold each 90-degree joint in place, and use a strap clamp when you want pressure around the whole frame. Some frames benefit from using both, especially when the miters tend to shift during tightening.
Corner clamps are useful for positioning one joint before the full frame is secured. Place them so the boards sit firmly against the 90-degree guides, then tighten only enough to hold the corner.
The WETOLS set includes 4 adjustable 90-degree corner clamps for boards from 3/16 in to 3/4 in thick. Its spring tension and one-hand operation can help hold the corners while you apply glue or prepare another clamp.
Use one clamp at each corner if the frame size and board thickness suit the clamps. Read Best Corner Clamps for Picture Frames for more options and fit considerations.
A corner clamp holds a joint, but it may not apply enough pressure around the entire frame by itself. Check every miter for a closed seam before leaving the assembly to cure.
How much pressure should you apply?
Apply only enough pressure to close the joints and keep the frame stable. Excessive force can slide the miters, bow thin frame stock, or squeeze too much glue from the joint.
Tighten in small steps and watch the front face as you work. If a corner starts to rise, stop tightening and push the board back into position before adding more pressure.
The Diylog corner clamp set uses 90-degree aluminum positioning squares with adjustable fixing blocks and screws. It is designed for frames and other assemblies where you need to position boards at a right angle, with a maximum clamping thickness of 3.5 in.
The larger positioning squares can suit thicker frame parts, but measure your stock before choosing them. Keep the screws and blocks clear of the glue joint so they don't interfere with closing the miter.
How do you check a clamped picture frame?
Check the front, back, corners, and diagonals before the glue sets. A frame can look aligned from above while one corner remains open or the whole assembly sits slightly out of square.
Inspect each miter from both faces. Look for a continuous seam, even board edges, and no step where one piece sits higher than the next.
Measure both diagonals again. If they differ, loosen the clamp enough to move the frame, adjust the opposite corners, and retighten without forcing the wood.
Wipe away fresh glue with a damp cloth if your glue instructions allow it. Avoid flooding the joint or rubbing glue deeper into an unfinished surface.
What mistakes should you avoid?
Avoid clamping before dry-fitting, tightening one corner too much, skipping the diagonal check, and leaving glue on the finished face. These mistakes can make a frame difficult to correct after the glue cures.
Don't use a clamp that contacts a delicate finished surface without protection. Add pads or place the clamp on the back of the frame where possible.
Don't assume a 90-degree corner clamp makes the whole frame square. It controls a joint, but the opposite diagonal still needs checking.
Don't remove the clamp as soon as the joints appear closed. Follow the glue manufacturer's cure guidance and keep the frame flat while it sets.
How do you clamp a picture frame with uneven pressure?
If one corner keeps opening, loosen the clamp, realign the frame, and change the pressure path instead of tightening harder. The problem may come from a twisted board, a poor miter, or a clamp pad that is not centered.
Use a small scrap block between the clamp pad and the frame if the pressure is landing beside the corner. Make sure the block is flat and does not push against a delicate edge.
For repeated alignment problems, use corner clamps to hold the joints first, then add a strap clamp around the complete frame. This separates positioning from final pressure.
What is the final check before the glue dries?
Before the glue dries, confirm that all 4 miters are closed, the front face is even, the frame is square, and no clamp is pressing against a fragile edge. Then leave the assembly undisturbed for the glue's recommended set time.
Pick a strap clamp when you want even pressure around the whole frame. Pick corner clamps when you need direct control over each 90-degree joint, and consider combining both when the frame shifts during glue-up.
If you are still planning the project, see How To Make A Picture Frame With A Miter Saw? for the cutting and assembly sequence.
Frequently asked questions
What is the best way to clamp a picture frame?
The best method is to align all 4 mitered corners, check the frame for square, and then apply even pressure with a strap clamp or corner clamps. Use only enough pressure to close the joints.
Too much force can shift the miters or squeeze out excessive glue.
How long should a picture frame stay clamped?
Keep a glued picture frame clamped for the time stated by your wood glue manufacturer. Many glues need more time before the frame can be handled safely, especially in a cool or damp shop.
Leave the frame flat and avoid removing clamps early just to inspect the joints.
How do you keep a picture frame square while gluing?
Keep a picture frame square by checking both diagonals after positioning the boards. The diagonal measurements should match or be very close.
Corner clamps can hold individual joints at 90 degrees, while a strap clamp applies pressure around the full frame.
Can you clamp a picture frame without a special clamp?
Yes, but the setup takes more care. You can use corner clamps, bar clamps with protective pads, or a carefully arranged strap around the frame.
Avoid clamping directly against finished surfaces, and check that the pressure reaches all 4 corners evenly.