How to Use Bar Clamps
To use bar clamps, position the jaws around the workpiece, tighten until the pads hold it firmly, and stop before excessive pressure causes damage. Keep the clamp square, protect finished surfaces, and check alignment before the glue sets.
On this page (10 sections)
- What does a bar clamp do?
- How do you use bar clamps step by step?
- How tight should a bar clamp be?
- What are bar clamps used for?
- Which bar clamp should you use for everyday workholding?
- Are mini bar clamps useful for small projects?
- Can you use a bar clamp as a spreader?
- How do you avoid slipping and misalignment?
- How do you release a bar clamp safely?
- How do you choose the right bar clamp?
To use bar clamps, set the jaws around the workpiece, align the parts, and tighten until they are secure without crushing the material. Keep the clamp bar straight, place the pads over strong areas, and check the joint before adding more pressure.
Bar clamps are useful for glue-ups, cabinet work, repairs, frame assembly, and temporary workholding. Before choosing a size, review this guide to woodworking clamps to compare bar clamps with parallel, pipe, and other clamp types.
What does a bar clamp do?
A bar clamp holds workpieces in a fixed position while you work or wait for glue to cure. The clamp has a long bar, a fixed jaw, a sliding jaw, and a handle or trigger that applies pressure.
The bar lets the jaws cover a wider opening than a small hand clamp. This makes bar clamps useful for joining boards, assembling cases, holding trim, and keeping parts aligned during drilling or fastening.
A clamp holds parts in place, but it doesn't correct poor fit. Dry-fit the pieces first and check that the joint closes evenly before tightening.
How do you use bar clamps step by step?
The basic process is measure, position, align, tighten, and recheck. A slow setup prevents a clamp from pulling the workpiece sideways or marking a finished surface.
- Measure the workpiece and choose a clamp with enough opening capacity.
- Set the sliding jaw close to the final position.
- Place the clamp so the pads contact solid, flat areas.
- Align the boards, frame, or joint before applying pressure.
- Tighten gradually until the pieces stay together.
- Check for bowing, slipping, and uneven gaps.
- Wipe away excess glue and leave the clamp in place as directed by the adhesive.
Keep the bar parallel to the work surface when possible. If the clamp sits at an angle, pressure may pull the parts out of square.
For larger cabinet panels and case assemblies, compare these best bar clamps for woodworking before selecting a bar length.
How should you position a bar clamp?
Position the clamp so its jaws push directly across the joint rather than at a sharp angle. The pads should sit on wide, stable areas instead of narrow edges or weak corners.
On a frame, use more than one clamp when one clamp would twist the assembly. Alternate clamp positions when practical so pressure is balanced from both sides.
Place scrap wood between the clamp pads and a finished surface if the pads could leave marks. This also spreads pressure across a larger area.
How tight should a bar clamp be?
Tighten only until the joint is closed and the workpiece no longer moves. A clamp should hold the parts steady, not force an uneven joint together.
Soft pine, thin trim, and veneered panels can dent under concentrated pressure. Use protective blocks and make small handle adjustments instead of tightening hard from the start.
Watch for three warning signs:
- The board bows away from the joint.
- The clamp pad starts to sink into the wood.
- Glue squeezes out across the entire joint.
If you see any of these signs, loosen the clamp slightly and check the fit again. A clean, even bead of squeezed-out glue is usually easier to manage than a joint forced under excessive pressure.
What are bar clamps used for?
Bar clamps are used for workholding tasks that need adjustable reach and steady pressure. Common uses include:
- Joining boards during a panel glue-up
- Holding cabinet sides while fasteners are installed
- Keeping a picture frame square during assembly
- Supporting trim while adhesive sets
- Stabilizing a repair before drilling or fastening
- Holding a jig or guide against a workpiece
- Separating parts when the clamp supports spreading
For questions about a specific saw project, these guides explain What Is A Miter Saw Used For? and What Is a Miter Saw Used For?. A bar clamp can hold material for layout, but it should not replace a proper saw fence, stop, or support.
Which bar clamp should you use for everyday workholding?
Choose a clamp based on the workpiece width, the required reach, and how much control you need during setup. Short clamps suit small repairs and boxes, while longer parallel clamps cover wider panels and case assemblies.
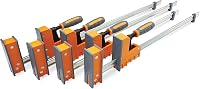
The Bora Parallel Clamps 4 Pack includes two 24 in clamps and two 31 in clamps. Its 3.5 in padded jaws, passive lock jaw, and large handle suit panel glue-ups, cabinetry, boxes, and larger case assemblies.
Choose this set when you need several longer clamps for cabinet or furniture work. Check the opening and throat needed for your project before buying.
Are mini bar clamps useful for small projects?
Mini bar clamps are useful when the workpiece is narrow and you need quick positioning. They are easier to place on small boxes, trim, frames, and repairs than a long clamp with a large handle.
The IRWIN QUICK-GRIP Clamps for Woodworking set includes 12 in and 6 in mini one-handed bar clamps, along with 2 in HANDI-CLAMP and resin spring clamps. Its QUICK-RELEASE triggers are designed for fast positioning, and the mini bar clamps exert up to 150 psi of clamping pressure.
Use these clamps when you need one-hand positioning and several short clamp sizes. The set is less suited to wide cabinet panels that need a long reach.
If your projects are mostly small, see these best mini bar clamps for more compact options.
Can you use a bar clamp as a spreader?
Some bar clamps can work as spreaders after the jaw is reversed or repositioned. Use the spreader function only when the clamp is designed for it and the jaw is locked correctly.
The JORGENSEN E-Z Hold 4-Pack 6" 200LBS Light has a 6 in maximum opening, a 2-3/8 in throat depth, and an E-Z Hold design that can be used as a clamp or spreader. Its sliding head is designed for one-handed use, and the clamps can be joined to create a larger opening.
Use this set for repairs, small glue-ups, and parts that need a short clamp. Its 6 in opening limits it on wide boards and large cabinets.
For more options, compare the best bar clamp spreader choices before using a clamp to push parts apart.
How do you avoid slipping and misalignment?
Dry-fit the workpiece and set each clamp before applying full pressure. This shows whether the clamp pads are centered and whether the parts move as the pressure increases.
Use two clamps when one clamp would let the workpiece pivot. On a panel glue-up, place clamps above and below the assembly when possible, then check the faces with a straightedge.
If the clamp keeps sliding, move the pads to a flatter area or use a protective block. Do not place a pad on a loose edge, a thin corner, or a section that cannot support the pressure.
Clean glue from the bar and pads after use. Dried adhesive can affect jaw movement and make the next setup harder.
For storage options, see bar clamp storage ideas.
How do you release a bar clamp safely?
Release the pressure gradually, then slide the jaw away from the workpiece. Keep your fingers clear of the pads and moving jaw while the clamp opens.
For a trigger clamp, squeeze or press the release control according to its design. For a screw-style clamp, turn the handle slowly rather than pulling the workpiece free while pressure remains.
Inspect the pads, bar, and jaw before storing the clamp. Do not use a damaged clamp for a load that could shift or fall.
How do you choose the right bar clamp?
Choose the shortest clamp that reaches across the workpiece with room for alignment, then select a longer or stronger model when the project needs more opening or pressure. The right clamp should hold the joint without bending the material or blocking your access.
Choose the Bora set for longer woodworking glue-ups and case assemblies. Choose the IRWIN set for small projects that benefit from quick-release, one-handed positioning.
Choose the JORGENSEN set for short light-duty clamping and spreading.
Bar clamps are used to hold, align, and support workpieces. Measure the project first, protect finished surfaces, tighten gradually, and check the joint before leaving the clamp in place.
Frequently asked questions
What does a bar clamp do?
A bar clamp holds two or more workpieces together while you glue, drill, cut, assemble, or repair them. Its fixed jaw and sliding jaw move along a long bar, so you can set the opening to fit different widths.
The pads apply pressure without requiring you to hold the parts by hand.
How tight should a bar clamp be?
Tighten a bar clamp until the workpiece stays in position and the joint closes evenly. More pressure is not always better.
Excessive force can bow boards, crush soft wood, squeeze out too much glue, or shift the parts out of alignment.
Can you use a bar clamp as a spreader?
Some bar clamps can be reversed and used as spreaders, but the feature depends on the model. Check the clamp's instructions before changing the jaw direction.
A spreader is useful for opening a joint, separating boards, or pushing a frame into position.
What are bar clamps used for?
Bar clamps are used for glue-ups, cabinet assembly, joinery, edge alignment, frame building, repairs, and holding parts during layout. Longer clamps suit wide panels and cases, while shorter clamps are easier to control on small boxes, trim, and craft projects.