How to Choose Sanding Belts and Discs
Choose sanding belts and discs by matching the abrasive format, grit and backing to your sander and task. Use coarse grit for faster material removal, finer grit for smoothing, and confirm the belt or disc size before buying.
On this page (12 sections)
- What is the difference between sanding belts and discs?
- How do you choose the right sanding belt size?
- What sanding belt grit should you use?
- How should backing affect your choice?
- Which sanding disc format fits a random orbital sander?
- How do you match a belt to a belt sander?
- What grit should you use for paint and finish removal?
- How does dust collection affect sanding discs and belts?
- How do you choose sanding belts for a specific brand?
- How should you use a sanding belt or disc?
- What are the main mistakes when buying sanding belts and discs?
- How do you choose between these sanding products?
Choose sanding belts and discs by matching the abrasive format, grit and backing to your sander and task. Coarse abrasives remove material faster, medium grits handle general smoothing, and fine grits prepare a surface for its final finish.
Start with the tool, not the abrasive package. Belt sanders need the correct loop size, while disc sanders and random orbital sanders need the right disc diameter and attachment pattern.
A belt or disc that fits your tool can still be the wrong choice for the work. Stock removal, edge shaping, paint stripping and finish sanding place different demands on grit, backing and pressure.
What is the difference between sanding belts and discs?
Sanding belts are continuous abrasive loops for belt sanders, while sanding discs are round abrasive sheets or pads for disc, random orbital and dual-action sanders. The shape determines how the abrasive mounts and how the tool moves it across the work.
Belts run around a sander's rollers or platen. They are useful when you want a long abrasive surface and steady contact across a board, panel or edge.
Discs attach to a circular pad. Their size and hole pattern must match the sander, and their round shape suits controlled work on flat or curved surfaces.
The two formats also encourage different sanding habits:
| Format | Main fit question | Common task |
|---|---|---|
| Sanding belt | Does the width and loop length match the belt sander? | Removing material from boards and panels |
| Sanding disc | Does the diameter and attachment pattern match the sander? | Surface preparation and smoothing |
| Hook-and-loop disc | Does the pad use matching hook-and-loop material? | Fast disc changes |
| Adhesive disc | Does the pad accept pressure-sensitive adhesive? | Direct attachment to a compatible pad |
If you are still deciding which tool belongs in your shop, compare the different types of sanders before buying belts or discs.
How do you choose the right sanding belt size?
Choose the belt size printed for your sander, including both width and loop length. A 3 x 18 in belt is a different format from a 3 x 21 in belt, even though the widths are the same.
Common belt sizes serve different machines and work areas. The size does not describe grit or quality.
It only tells you whether the loop should fit the tool.
| Belt size | What to confirm |
|---|---|
| 1 x 30 in | The sander accepts a narrow 1 x 30 in loop |
| 3 x 18 in | The tool uses a 3 x 18 in belt |
| 3 x 21 in | The tool uses a 3 x 21 in belt |
| 4 x 36 in | The tool accepts a 4 x 36 in belt |
| 6 x 48 in | The tool accepts a 6 x 48 in belt |
The belt must sit correctly on the rollers and remain centered during use. If the size is wrong, tracking may fail or the belt may not run safely on the machine.
For a small benchtop or detail belt sander, see the best 1x30 sanding belts. For a common handheld format, compare the best 3x21 sanding belts.
Larger machines need their own belt format. Our guides to best 4x36 sanding belts and best belt sander belts 6x48 can help when those are the sizes printed for your tool.
What sanding belt grit should you use?
Use the coarsest grit that solves the current problem without removing more material than needed. Then move to a finer grit to reduce the scratches left by the previous step.
Grit numbers work as a practical order from aggressive removal to smoother sanding:
| Grit range | Best use |
|---|---|
| Coarse | Removing finish, leveling uneven areas and shaping stock |
| Medium | General smoothing and preparing a surface |
| Fine | Removing visible scratches and refining a surface |
| Extra fine | Light finishing or final surface preparation |
A coarse belt can remove material quickly, but it also leaves deeper scratches. Use it only when the surface needs that level of correction.
Medium grit is often a useful middle stage after leveling. It can reduce coarse scratches without taking away as much material as another coarse pass.
Fine grit is for refining rather than correcting major unevenness. If the surface still has deep dents or a heavy finish, starting with fine grit may take longer and encourage excess pressure.
Do not jump from a very coarse abrasive straight to a fine one when the scratches remain visible. Step through an intermediate grit so the finer abrasive does not have to remove every deep mark.
How should backing affect your choice?
Choose backing by balancing flexibility, support and the pressure the sanding task requires. The backing holds the abrasive together as the belt or disc moves across the work.
A flexible backing can follow slight curves and contours. A stiffer backing can support more even contact on a flat surface, but it may be less suited to tight curves.
The backing also needs to tolerate the tool's movement. A belt bends around rollers, while a disc stays attached to a circular pad.
Check the abrasive's intended use and your sander's instructions before choosing. If you plan to sand with a drill, compare drill sanding disc attachments.
Avoid forcing a belt or disc to fit a tool when the attachment system or size does not match.
Backing alone does not determine the result. Grit, abrasive material, pressure, speed and dust all affect how quickly the surface changes.
Which sanding disc format fits a random orbital sander?
A random orbital sander needs a disc with the correct diameter and attachment method, plus any hole pattern required for dust collection. For a common size, compare five-inch sanding discs.
The disc must cover the pad without overhanging it.
Hook-and-loop discs are convenient when you change grits often. Adhesive-backed discs require a compatible pad and careful placement.
A dual-action orbital sander also uses a circular pad, but the pad size and attachment method still matter. The Ingersoll Rand 328B has an 8 in pad, so an abrasive disc for that tool must match its circular pad format.
The 328B is an air-powered sander with a 0.25 hp motor, up to 825 rpm and a 5/32 in orbit diameter. Its dual-action pad motion and variable speed are intended to help control the sanding process.
Its ergonomic grip and low-vibration design may matter when a sanding task lasts long enough for handling comfort to affect control. Ball-bearing construction contributes to balance and durability.
The tool is sold individually, and an air compressor is not included. It is aimed at automotive body work, metal fabrication and woodworking, with a circular pad for surface preparation, flat panels and paint stripping.
Choose it when your shop already has suitable compressed air and your work calls for an 8 in pneumatic orbital sander. Choose a different setup if you need a corded belt sander or do not have an air compressor.
How do you match a belt to a belt sander?
Match a belt by checking the exact width, loop length and tracking system required by the sander. The belt should run centered without forcing the tool to correct constantly.
A belt sander is useful when you need more linear contact for boards, panels or other flat work. Keep the tool moving so the abrasive does not cut a hollow into one area.
The SKIL 7510-01 uses a 3 x 18 in belt and has a 6 A corded electric motor. Its pressure control technology warns when excessive pressure is applied, which can help you keep a steadier sanding approach.
This sander has auto track belt alignment to keep the belt centered. It also supports flush-edge sanding, which allows sanding close to an edge when the workpiece and setup permit it.
Micro-filtration is designed to capture and contain fine dust particles. The sander is compatible with standard 1-1/4 in vacuum hoses, so dust collection can be part of the setup.
The 6 A motor is intended for wood surfaces, and the tool is corded electric at 120 volts. The included component is the SKIL 120V 3 x 18 in 6.0 A belt sander.
Choose it when your projects use the 3 x 18 in belt format and you want an indicator for pressure control. It is not the right choice for a 3 x 21 in, 4 x 36 in or 6 x 48 in belt unless your tool specifically accepts that size.
For more belt choices, see best sanding belts for belt sanders. If your tool is a Ryobi model, compare best sanding belts for Ryobi belt sander before ordering.
What grit should you use for paint and finish removal?
Use a coarse or medium abrasive for removal, then change to a finer abrasive to smooth the surface. The right starting grit depends on how thick, hard or uneven the material is.
Paint stripping often needs enough cutting action to break through the coating. Apply controlled pressure and keep the tool moving so the abrasive does not create a deep low spot in the material below.
After the coating is gone, inspect the surface before choosing the next grit. A medium abrasive may remove the first round of scratches, while a fine disc or belt can prepare the surface for a later finish.
Do not treat a fine abrasive as a faster option. Fine grit removes less material per pass, so it is better for refining a surface that is already reasonably even.
If you are working with a miter saw project, make sure the sanding stage follows safe cutting and handling practices. The guides to How To Choose A Miter Saw? and How To Choose Miter Saw Blade? cover the tool and blade choices that often come before sanding.
How does dust collection affect sanding discs and belts?
Dust collection helps keep sanding debris from spreading and can make the work area easier to manage. Choose a sander and abrasive setup that supports the dust method you can actually use.
Some disc sanders use holes in the abrasive and pad to draw dust through the tool. The holes must line up if the design depends on that path.
A belt sander may connect to a vacuum hose or use a dust container. The SKIL 7510-01 fits standard 1-1/4 in vacuum hoses and also has micro-filtration for fine dust particles.
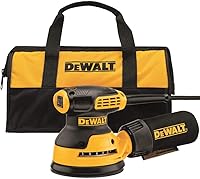
Replacement parts need exact tool compatibility. The DEWALT 380412-00 is a dust bag replacement for specified DeWalt models, so confirm your model and part number before installing it.
This is a genuine DeWalt replacement part, supplied as 1 dust bag and bulk packed. The listed compatible models include DW421, DW422 EVS, DW423 15 inch EVS, D26441, D26453, D26450, D26451, 2771, 27708 5 with EVS, 27707 and 25708 5 orbital sander.
The part has a rectangular prism shape and weighs 2.08 ounces. It is a manual replacement component, not a powered sander or abrasive.
Consult the owner's manual for proper part number identification and installation. Choose this part only after confirming that your sander model appears among the compatible models.
How do you choose sanding belts for a specific brand?
Choose by the belt dimensions required by the model, not by brand name alone. Makita, Ryobi, Milwaukee and other brands can use different belt formats across their product lines.
A model-specific guide can narrow the size first, then help you compare grit and pack options. This avoids buying a belt that matches the brand but not the machine.
For Makita users, see best makita belt sander paper. If your tool requires the 3 x 18 in format, compare best belt sander paper 3x18.
Milwaukee M12 users should confirm the exact compact tool format before ordering. Our guide to milwaukee belt sander m12 belts focuses on that model-specific choice.
The GXK51 format also deserves a separate check because a belt can look close in size while still using the wrong dimensions or backing. Read how to choose GXK51 sanding belts before selecting that type.
How should you use a sanding belt or disc?
Use light, even pressure and let the abrasive do the cutting. Excess pressure can slow the tool, clog the abrasive and make it harder to keep the surface flat.
Prepare the workpiece before sanding. Remove loose hardware, support the material and mark the area that needs attention so you can see your progress.
For a belt sander, keep the base moving in a controlled direction. Do not pause over one spot unless the task specifically requires careful local work.
For a disc sander, keep the disc flat when the tool design calls for flat contact. Tilting can concentrate the abrasive on a small edge and change the surface faster than expected.
Begin with a safe test area or an offcut when the material and finish are unfamiliar. This lets you see how the chosen grit behaves before you work on the visible face.
Inspect the abrasive regularly. Replace it when the cutting action fades, the belt or disc clogs repeatedly, the backing is damaged or the edges begin to fail.
What are the main mistakes when buying sanding belts and discs?
The most common mistakes are choosing the wrong size, starting with an unsuitable grit and applying too much pressure. A correct match between tool, abrasive and task prevents most avoidable problems.
Avoid these errors:
- Buying by width alone and ignoring loop length.
- Assuming every round disc uses the same hole pattern.
- Starting with fine grit on a surface that needs leveling.
- Using coarse grit after the surface is already smooth.
- Pressing harder when a worn abrasive stops cutting.
- Ignoring the sander's dust collection method.
- Fitting a replacement dust part without checking the model.
- Storing belts where they can bend, crease or become damp.
- Continuing with a damaged belt or disc.
Belts should remain flat and free from sharp bends. Discs should stay clean and attached evenly to the pad.
Your tool manual remains the best source for approved belt dimensions, disc diameter, attachment method and replacement parts. Measure the abrasive and sander together when the format is unclear.
How do you choose between these sanding products?
Choose the SKIL 7510-01 for a corded 3 x 18 in belt-sanding setup on wood, especially when pressure control, auto tracking and vacuum compatibility matter. Choose the Ingersoll Rand 328B for an 8 in air-powered dual-action orbital sander and flat-surface material removal.
Choose the DEWALT 380412-00 only when you need a compatible replacement dust bag for one of its listed DeWalt sanders. It is a maintenance part, so it does not replace the need for the correct belt, disc or sanding tool.
The decision rule is simple: match the format first, select grit for the amount of material you need to remove, then choose backing and dust control for the way you work. That order keeps sanding belts and discs compatible, controlled and useful from the first pass through the final smoothing stage.
Frequently asked questions
How do I choose sanding belts and discs?
Choose sanding belts and discs by checking the sander's required format and size first, then select grit for the work. Coarse grit removes material quickly, medium grit handles general sanding, and fine grit smooths a prepared surface.
Match the backing strength and abrasive type to the pressure and material involved.
What grit sanding belt should I use first?
Start with the finest grit that removes the marks, finish or uneven material you need to address. Coarse grit works for faster stock removal, while medium and fine grits refine the surface.
Move through grits in order and clean the workpiece between stages so leftover coarse scratches do not remain.
Are sanding belts and discs interchangeable?
Sanding belts and discs are not interchangeable because they use different shapes, mounting methods and sander formats. A belt sander needs the correct belt length and width, while a disc sander or random orbital sander needs a compatible disc diameter and attachment pattern.
Check your tool before ordering.
How do I know what size sanding belt I need?
Use the belt size specified for your sander, such as 3 x 18 in, 3 x 21 in, 4 x 36 in or 6 x 48 in. The belt must match both width and loop length.
A belt that is too wide, too narrow or the wrong length will not track correctly.
When should I replace a sanding belt or disc?
Replace a sanding belt or disc when it cuts slowly, clogs repeatedly, loses its abrasive surface or shows damage. Continuing with a worn abrasive can increase pressure and heat without improving the result.
Inspect the backing and edges before each use, especially after sanding rough stock.